
Sunday, September 07, 2008

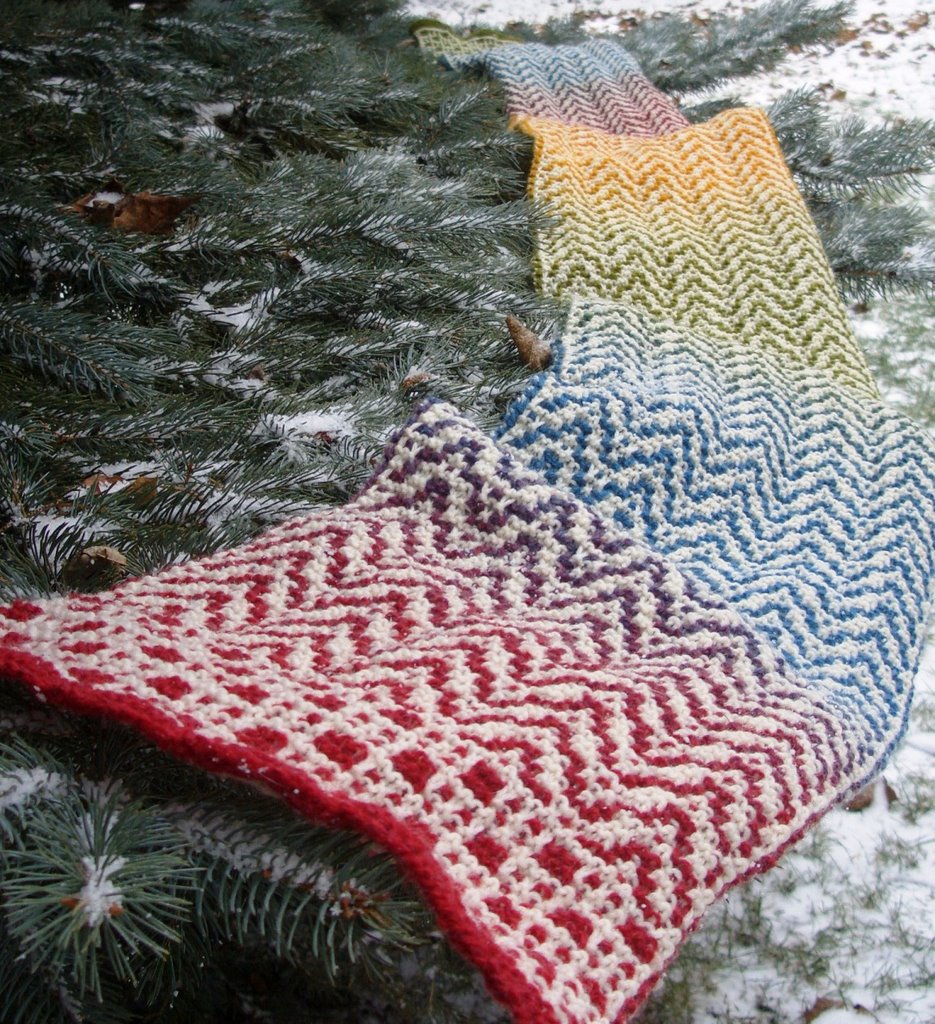
Three Sisters Scarves # One

Errata: the first 2 stitches and the last 2 stitches ARE charted.
row 2 of chart should read: knit all stitches
Thursday, June 12, 2008
Double Knit Scarf
 Please don't ask me how to double knit. You can find information about that online or there's a DVD from Lucy Neatby on how to double knit, which is the way I learned.
You can find the design chart here.
Some notes to the scarf:
It is 21 stitches wide. I used Knit Picks Comfy, 75% Cotton, 25% Acrylic, color# Comfy Fedora B118 and Comfy Sea Foam B981, one ball each.
It turned out 4" x 37" - I know it's short, but I could not stand the double knitting any longer. Maybe you have the stamina for it?
Knit with 4mm straight needles.
A word about the chart: I did the chart in a hurry for myself. People asked for a pattern for this scarf, so I took the chart I made as it was.
It is to be read upside down. The numbers within the chart should be ignored, the squares they are on are counting as a stitch.
I've knit 5 rows plain before I started with the big design. It is supposed to be knit first, after the big design is finished I've knit 10 rows plain, and started the small design, which is only 3 rows high. Repeat the 10 plain rows, followed by 3 rows of the small design until you can not take it any longer. After the last small design knit 10 plain rows, followed by the big design. Finish with 5 plain rows and bind off.
Would love to see a picture of your finished scarf!
Good Luck!

Wednesday, May 07, 2008
Mohana Shawl!
 pattern can be found here
Errata: Chart C, written row 1 should read:
K2, PM, YO, K1, [YO, Sl1-K2tog-PSSO, YO, K3], repeat [to] 25 times, YO, Sl1-K2tog-PSSO, YO, K1, YO, PM, center stitches, then repeat whole section as mirror image from marker to marker on the other side of the shawl and end with k2 border stitches.

Thursday, May 01, 2008
Have a Heart Scarf


This scarf was designed for Scarves from the Heart. Please consider making one, and donating it to this charity. Thank you!
Tuesday, April 01, 2008


Friday, April 27, 2007


Sunday, April 15, 2007

Monday, February 26, 2007
ASHES
 Print it or you can e-mail me for the free pattern for a pdf file
“ASHES”
By Monika Steinbauer
This is a cuff down sock pattern with a slip stitch pattern looking a little like cables, but so much easier to knit. The pattern goes down the heel, which makes these socks look good in open shoes. The stitch pattern pulls together while knitting, but stretches with blocking or wearing. It's best to use solid or almost solid yarn for it.
The instructions are for women size 9, but with a different needle size and/or heavier weight yarn you can make them larger (or smaller).
Material: fingering weight yarn (sock yarn) 100g; 5 double point needles 2.25mm, stitch marker.
Gauge: 7 sts = 1 inch; 10 rows high = 1 inch
eor: end of row
s1wyib: slip 1 as if to knit with yarn in back
s1wyif: slip one as if to purl with yarn in front
Stitch pattern: multiples of 6
for knitting in the round:
rows 1-4: P2, K4 repeat all around.
Row 5: [P2, YO, s1wyib, K3, psso3sts] repeat all around.
For knitting back and forth:
Row 1 & 3: (RS) P2, K4 repeat to end of row.
Row 2 & 4: (WS) K2, P4, repeat to end of row.
Row 5: this row will be knitted on a RS row and a WS row as well. The first time it’s
[P2, YO, s1wyib, K3, psso3sts] to end of row. When the next 5th row comes around it will be on a WS and knitted as follows:
[K2, P3, but these 3 sts back on left needle, pull 4th sts over 3 purled sts, put them back on right needle, YO] repeat to the end of row.
Cast on 64 sts, join for knitting in the round, take care not to twist stitches. Place marker = eor. 16 sts for each needle (1,2,3 & 4)
K2, P2 all around for 18 rounds (or desired length of ribbing).
Next round: decrease 4 sts evenly. = 60 sts.
Next round: Knit
Next round start slip stitch pattern. Repeat 5 row pattern 8 times.

Heel Flap:
Note: for heel flap we will borrow 2 sts from needle one.
The marker should be at the beginning of needle one, and the end of needle four.
Now we are going to knit back and forth on needles 3 & 4. We will be working over 32 sts (including the 2 borrowed sts from needle one).
Every row: slip the first stitch, knit or purl the last sts of the row depending on RS or WS.
Knit 4 repeats of slip stitch pattern (one repeat is 5 rows) for back and forth. Knit one more pattern repeat but only 4 rows. The last row should be a completed RS row.
Heel turn:
Row 1: slwyif, P19, P2tog, P1, turn.
Row 2: slwyib, K 8, ssk, K1, turn.
Row 3: slwyif, P 9, P2tog, P1, turn.
Row4: slwyib, K10, ssk, K1, turn.
Continue in this manner until all sts. are used up (completed RS row). Do NOT turn. (20sts) Arrange sts. on the 2 needles (10 sts. each).
Gusset:
Pick up 12 sts. Make 1 sts. between needle 4 and 1. After picking up and knitting 12 sts plus 1, put 2 sts. back on needle 1 (this are the two borrowed sts).
Knit needle 1 & 2 in slip stitch pattern.
Make 1 sts between needle 2 & 3. Pick up and knit 12 sts.
There should be 44 sts on needles 3 & 4.
Knit to one sts before last. K1tbl.
Arrange sts on needle 3 & 4, so there are 22 sts. on each needle.
Gusset decrease:
Row 1: work needle 1 & 2 in slip stitch pattern, K1tbl, K2 tog, K to 3 sts before eor, ssk, k1tbl.
Row 2: work needle 1 & 2 in slip stitch pattern, k1tbl, knit to 1 sts before eor, k1tbl.
Repeat these 2 rows until there are 15 sts on each needle.
Foot: Continue to knit slip stitch pattern on top of foot and knit on the sole, until there are 21 pattern repeats from cuff (or 2”, measured from back of heel, before desired foot length).
Toe:
Knit all rounds. Decrease as follows:
Row 1: K1, ssk, k to 3 sts before end of needle 2, k2tog, k2, ssk, k to 3 sts before eor marker, k2tog. K1. (4 sts decreased)
Row 2: Knit.
Repeat these two rows 5 times. Repeat Row 1 one more time.
Repeat row 1 until there are 16 sts left.
Join remaining toe sts with Kitchener stitch. Weave in ends. Make a second sock. Enjoy!

Wednesday, February 07, 2007

Monday, February 05, 2007
Question for blogging geniuses!
Well, I've written my "Smoking Hot Socks" pattern in Word and have no idea how to get it up here or anywhere. Is there someone out there who could enlighten me, please? I've included photos, and the usual copy/paste isn't really working out. If you can help, please do so!
Thanks,
Monika
Thanks,
Monika
Tuesday, January 02, 2007
Vertigo
~Vertigo~
Material:
basically two contrasting colors of yarn with the same weight; in this case I’ve used Evilla 100% wool in the color “Rainbow”, 6/2, 185 g and 5 ½ balls 50 g/125 meter each of Schoeller & Stahl Fortissima 6-fach Socka, sock yarn in natural white. There was no yardage on the Evilla yarn label. The sock yarn was slightly heavier yarn than the Evilla, but the closest I could get.
A pair of straight 3 ¾ mm needles(or whatever you are comfortable with)
Gauge is not important, since it’s a scarf.
Finished size: 10” x 112”
Slip – stitch pattern:
The first column of the charts tells you which color to use. The dark boxes are the main color (dark) and the white boxes are the light color. You’ll always knit with only one color for two rows (right side and back side). The other color will wait on the right side to be used later. Depending on the color you work with, you will knit the boxes in the color you are using and slip the stitches from the other color. On the right side you’ll slip the sts with the yarn in the back. On the wrong side you will slip the sts with the yarn in front of you.
This scarf is worked in garter stitch throughout.
With the main color (in this case the rainbow colored yarn) cast on 66 sts. Work 5 rows in garter stitch.
Next row: with light yarn K1, slip one stitch, knit to the second last stitch, slip one stitch, K last stitch.
Next row: K knitted stitches and slip the slipped stitches as they appear.
Now start with chart one. Knit chart one for 24 rows.
Start chart 2. Knit as long as you feel like you can stand it.
Don’t forget to mirror the end with the beginning and knit chart 1 for 24 rows again.
Knit 2 rows with the light colored yarn. Knit 5 rows with main color.
Bind off.
The edges are three sts in the beginning and the end. They are knit always in the same manner. The first sts of the three are like a checker board, dark, light, dark, light and so on. The second sts. are knit in the dark (main color), the third sts. is knit with the lighter color, after that the pattern from the charts begins.
Thursday, October 26, 2006
Chevron scarf
yarn: Karaoke 50% soy silk, 50% wool, 3 balls/~ 300 meters/150g (even though I did not enjoy this yarn for this project, I think with another striping or multicolored yarn this is a nice pattern)
needles: 5mm
size: 5" x 64"
Cast on 35 sts (I've used long tail cast on).
for the whole length of scarf: slip the first stitch as if to purl with yarn in front, and purl the last stitch of each row. This makes a nice braided like edge.
decrease:
Sl1-K2-Psso: Slip (as if to purl) - K next 2 sts together - pass slipped sts over
increase:
K1fb: knit once in front and once in back loop of the same stitch
pattern:
row 1: sl1, (K1,P1) 3 times, K1, K1fb, k7, Sl1-K2-Psso, K7, K1fb, (K1,P1) 4 times.
row2: sl1, knit to last stitch, Purl.
You might want to place a marker before K1fb and after the second K1fb.
Repeat these two rows until desired length.
Bind off. The beginning and the end will NOT match.
This pattern is for your personal use. You can share it with your friends or use it for charity knitting, but do not use it for commercial use. If you print it make sure my information is included.
Monika Steinbauer/www.yarnloopie.blogspot.com/yarnloopie@yahoo.ca
Friday, September 08, 2006
"His scarf" the cashmere one!
"His (Birthday) scarf"
Finished size: about 7" wide and 54" long (after lightly blocking)
Yarn: Artyarns Cashmere5, 100% 5-stranded cashmere, 3 balls 50 gr each or 306 yds. color#247 (light grey)
Needles: 4mm needles or US # 6
Gauge: 6 sts/inch and 7 rows/inch (for scarf not that important)
Note: The Artyarns Cashmere5 calls for US # 8 (4.5 sts/inch) but I'm a loose knitter so I've used # 6. I liked the texture of the finished fabric.
Note: you might want to use markers to place for seed stitch border on both sides
Stitch pattern found in the book "Folk Shawls" by Cheryl Oberle
Seed stitch: (even number of sts)
row 1: *K1, P1; repeat from * to end.
row2: *P1, K1: repeat from * to end.
repeat rows 1 and 2 for pattern.
Pattern stitch ( a multiple of 14 sts plus 2)
rows 1, 3 and 5: K2,*(p1,k1) 2 times, p1, k2; repeat from *.
rows 2, 4 and 6: * P3,(k1, p1) 2 times; repeat from *, end last repeat p3 instead of p1.
row 7: K2, * p12, k2; repeat from *.
row 8: Knit the knits and purl the purls as they appear.
row 9: knit.
rows 10, 12, and 14: *P2, (k1, p1) 2 times, k1; repeat from *, end p2.
rows 11, 13, and 15: K2, *(k1,p1) 2 times, k3; repeat from *.
row 16: K2 *K5, p2, k7); repeat from *.
row 17: Knit the knits and purl the purls as they appear.
row 18: Purl.
repeat rows 1-18 for pattern.
Scarf
Cast on 44 sts.
Work 7 rows seed stitch. Maintain the seed stitch borders, (place markers) on the first and last 7 sts of each row. The main pattern is worked on the 30 sts in between the markers.
Repeat the main pattern-repeat 19 times.
Work 7 rows seed stitch and bind off.
Weave in ends and block lightly.
Have fun knitting! (and send me a picture of your finished scarf) ;o)
This is a free pattern for personal use only. You can share it with friends for non commercial use. Do not reprint in books or magazines without my permission.
Monika Steinbauer; yarnloopie@yahoo.ca
Wednesday, August 02, 2006
"Her-scarf"
 "Her-scarf"
size: ~ 6.5" X 76" (or ten pattern repeats)
4.5mm needles
yarn: Queensland Collection Kathmandy DK ~ 370 yds
k knit
p purl
sl-st wyib slip-stitch with yarn in back. A stitch has been slipped from left needle to right needle without working.
RT right twist: 2 stitches twisted so that the one on the right side of the fabric moves diagonally from left to right. skip 1st st and knit the 2nd st on the left needle in front loop, then knit the skipped st in front loop, slip both sts from needle together.
LT left twist; 2 stitches twisted so that the one on the right side of the fabric moves diagonally from right to left. skip 1st st and knit the 2nd st on left needle in back loop, then knit the skipped st in front loop, slip both stst from needle together.
[] [K-P-K-P-K]
CO 40 sts
Knit row 1-6
row 7 [K-P-K-P-K]-P-SL-ST WYIB-P12-RT-P12-SL-ST WYIB-P-[K-P-K-P-K]
row 8 [] K-P-K-P24-K-P-K []
row 9 [] P-SL ST WYIB-P11-RT-LT-P11-SL ST WYIB-P []
row 10 [] K-P-K11-P4-K11-P-K []
row 11 [] P-SL ST WYIB-P10-RT-K2-LT-P10-SL ST WYIB-P []
row 12 [] K-P-K10-P6-K10-P-K-[]
row 13 [] P-LS ST WYIB-P9-RT-K4-LT-P9-SL ST WYIB-P-[]
row 14 [] K-P-K9-P8-K9-P-K-[]
row 15 [] P-SL ST WYIB-P8-RT-K6-LT-P8-SL ST WYIB-P-[]
row 16 [] K-P-K8-P10-K8-P-K-[]
row 17 [] P-SL ST WYIB-P7-RT-K8-LT-P7-SL ST WYIB-P[]
row 18 [] K-P-K7-P12-K7-P-K-[]
row 19 []P-SL ST WYIB-P6-RT-K10-LT-P6-SL ST WYIB-P[]
row 20 [] K-P-K6-P14-K6-P-K []
row 21 []P-SL ST WYIB-P5-RT-K12-LT-P5-SL ST WYIB-P[]
row 22 [] K-P-K5-P16-K5-P-K []
row 23 []P-SL ST WYIB-P4-RT-K14-LT-P4-SL ST WYIB-P[]
row 24 []K-P-K4-P18-K4-P-K []
row 25 [] P-SL ST WYIB-P3-RT-K16-LT-P3-SL ST WYIB-P-[]
row 26 []K-P-K3-P20-K3-P-K-[]
row 27 [] P-SL ST WYIB-P2-RT-K18-LT-P2-SL ST WYIB-P[]
row 28 []K-P-K2-P22-K2-P-K[]
row 29 []P-SL ST WYIB-P-RT-K20-LT-P-SL ST WYIB-P[]
row 30[] K-P-K-P24-K-P-K[]
row 31[]P-SL ST WYIB-LT-K20-RT-P-SL ST WYIB-P[]
row 32[]K-P-K2-P22-K2-P-K[]
row 33[]P-SL ST WYIB-P2-LT-K18-RT-P2-SL ST WYIB-P[]
row 34 []K-P-K3-P20-K3-P-K[]
row 35[]P-SL ST WYIB-P3-LT-K16-RT-P3-SL ST WYIB-P[]
row 36[]K-P-K4-P18-K4-P-K[]
row 37[]P-SL ST WYIB-P4-LT-K14-RT-P4-SL ST WYIB-P[]
row 38[]K-P-K5-P16-K5-P-K[]
row 39[]P-SL ST WYIB-P5-LT-K12-RT-P5-SL ST WYIB-P[]
row 40[]K-P-K6-P14-K6-P-K[]
row 41[]P-SL ST WYIB-P6-LT-K10-RT-P6-SL ST WYIB-P[]
row 42[]K-P-K7-P12-K7-P-K[]
row 43[]P-SL ST WYIB-P7-LT-K8-RT-P7-SL ST WYIB-P[]
row 44[]K-P-K8-P10-K8-P-K[]
row 45[]P-SL ST WYIB-P8-LT-K6-RT-P8-SL ST WYIB-P[]
row 46[]K-P-K9-P8-K9-P-K[]
row 47[]P-SL ST WYIB-P9-LT-K4-RT-P9-SL ST WYIB-P[]
row 48[]K-P-K10-P6-K10-P-K[]
row 49[]P-SL ST WYIB-P10-LT-K2-RT-P10-SL ST WYIB-P[]
row 50[]K-P-K11-P4-K11-P-K[]
row 51[]P-SL ST WYIB-P11-LT-RT-P11-SL ST WYIB-P[]
row 52[]K-P-K12-P2-K12-P-K[]
repeat row 7-52 ten times or desired lenght)
knit last 6 rows
Bind off. Weave in ends. Block scarf. Attach fringes if desired. Embroider daisies in contrasting colors in the middle of the diamonds.
Wear with pride! Have fun knitting,
Monika
This pattern is for personal use only. You can share it with friends, but not for any commercial use. Do not reprint in books or magazines without my permission.
Monika Steinbauer; yarnloopie@yahoo.ca
Saturday, July 08, 2006
Toe-up Sock with magic cast-on and reverse dutch heel
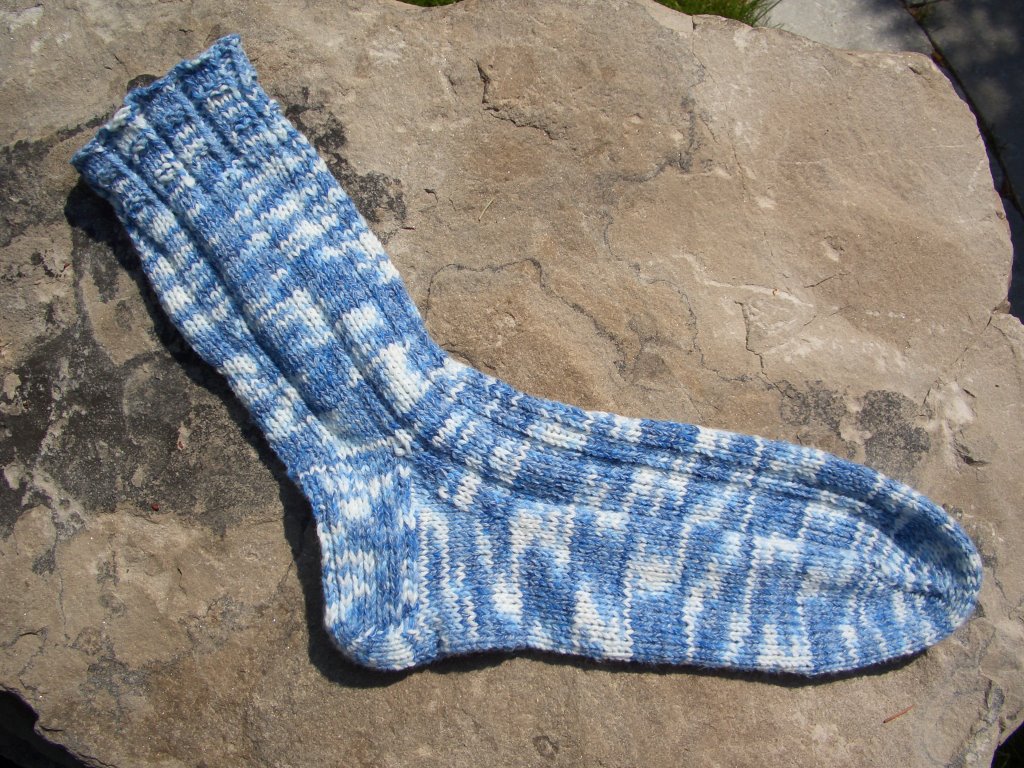 click for a closer look
- First got to Knitty and get the instructions for the magic cast-on by Judy Becker. This technic is well worth learning and not difficult at all (maybe only knitting the first row).
- Knit desired length to start the gusset increase which I did with M1 (make 1): make a backward loop over the right-hand needle. Don't forget to do it on both sides.
- Go to sock knitters where you can find Denise's Powell Toe-up Socks. There will be several lessons for every step, but she uses a different cast on.
- Knit the leg to desired length. If you have to don't forget to make increses in the back of the leg.
- The ripping is supposed to be strechy and different looking.
R 1-4: K1b, K2, K1b, P2 repeat all around
R5-6: K1b, P2 repeat all around.
6. Since the cast off is most likely too tight I've tried Elizabeth Zimmermann's sewn casting-off, which is also explained in the last of Denise's Lesson or you can find the directions in one of E.Z. many books.
7. For the top of the sock and around the leg I've used a simple pattern, since it's a man's sock and variegated yarn as well: K1, P1, [ K5, P1, K2, P1] repeat from [ ] You can change the stitch count around K4 or K5 or K6 depending on your stitch count.
Hope this helps at all. Have fun discovering the world of socks, like I did. There's still so much to learn and I will.
Happy knitting.
Monika Steinbauer; yarnloopie@yahoo.ca
Monday, May 15, 2006
Garter Slip Stitch Dishcloth!

Garter slip stitch dishcloth
Material: sugar’n cream 100% cotton, color A and color B
Needles: US 7 (4.5mm)
Finished size app. 8.5” X 9”.
CO 45 sts
Work rows 1 to 8 of garter slip stitch - (2 stst repeat +1)
2 rows A, 2 rows B; rep from * until desired length.
Sl all sts purlwise
Pattern: from “knitting on the edge” by Nicky Epstein
Row 1 and 2 knit.
Row 3 (RS) k1, * sl 1, k1; rep from * to end.
Row 4 k1, *sl 1 wyif, k1 wyib; rep from * to end.
Row 5 and 6 knit.
Row 7 k2, *sl 1, k1; rep from * end k2.
Row 8 k2, *sl1 wyif, k1 wyib; rep from *, end k2.
Repeat rows 1 to 8 until desired length.
BO. Weave in ends.
Happy knitting!
Monika Steinbauer; yarnloopie@yahoo.ca
Saturday, May 13, 2006
"Peaks & Valleys Scarf"

“Peaks & Valleys Scarf”
Material: karaoke 50%Soy Silk/50%wool, color rainbow, 6 X 50 grams/100 meters
US 7 needle
Pattern: from "A Treasury of Knitting Patterns" by Barbara G. Walker "Chevron"
s1: slip one sts knitwise
CO 33 sts.
Row1-4: knit (slip first sts in every row; perl last sts in every row)
Row5: s1,k3, k1, *p7,k1; rep from * k3,p1.
Row6: s1, k3, p1, * k7, p1; rep from *, k3, p1.
Row7:s1, k3, k2, * p5, k3; rep from *, end p5, k2, k3, p1.
Row8:s1, k3, p2, * k5, p3; rep from *, end k5, p2, k3, p1.
Row 9:s1, k3, k3, * p3, k5, rep from *, end p3, k3, k3, p1.
Row 10: s1, k3, p3, * k3,p5; rep from *, end k3, p3, k3,p1.
Row 11: s1, k3, k4, * p1, k7; rep from *, end p1, k4, k3, p1.
Row12: s1, k3, p4, * k1, p7; rep from *, end k1, p4, k3,p1.
Row13: repeat row 6
Row 14: repeat row 5
Row 15: repeat row 8
Row16: repeat row 7
Row 17: repeat row 10
Row 18: repeat row 9
Row 19: repeat row 12
Row 20: repeat row 11
Repeat rows 5-20.
Knit to desired length.
Knit 4 rows. (slip first sts in every row; perl last sts in every row).
BO.
Weave in ends. Attach fringes if desired.
Happy knitting!
this pattern is for personal , non commercial use only. You can share it with friends. Do not reprint in books or magazines without my permission.
Monika Steinbauer; yarnloopie@yahoo.ca
Subscribe to:
Posts (Atom)

